
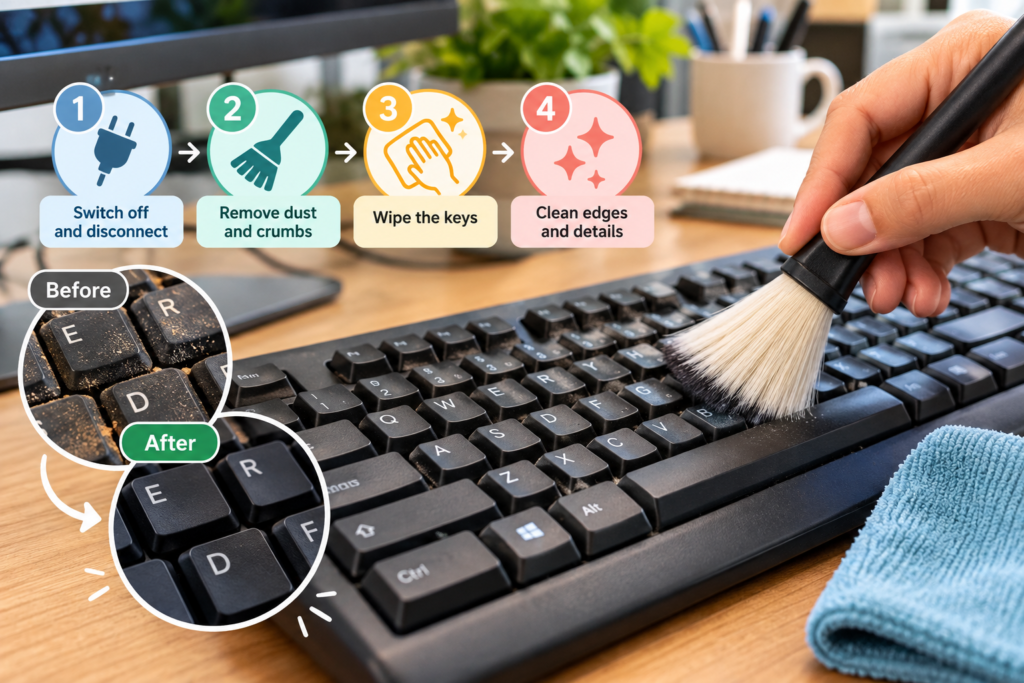
Cleaning an office keyboard properly helps remove dust, crumbs, fingerprints and everyday grime without damaging the keys or electrical components. With the right supplies and a careful method, you can keep your keyboard hygienic and comfortable to use.
Office keyboards are handled throughout the working day, often by people who eat at their desks or share equipment with colleagues. Dirt can collect between the keys, while oils from fingers gradually leave the surface looking dull or sticky.
The good news is that routine cleaning does not need to be complicated. A few simple steps will help you clean your keyboard safely, whether you work from home or maintain equipment in a busy office.
What Is the Best Way to Clean an Office Keyboard?
The best way to clean an office keyboard is to switch it off or disconnect it, remove loose debris, clean around the keys with a soft brush, and wipe the surfaces using a lightly dampened microfibre cloth.
You will need:
A clean, dry microfibre cloth.
A soft cleaning brush or small, clean paintbrush.
A cotton bud for narrow gaps, if needed.
A small amount of suitable keyboard-safe cleaning solution or isopropyl alcohol, where permitted by the manufacturer’s instructions.
A vacuum cleaner with an appropriate soft brush attachment, if suitable for the equipment.
The most important safety rule is to keep liquid away from the keyboard’s openings. Never spray cleaning products directly onto the keys, pour liquid between them or soak the keyboard.
For a standard office keyboard, a quick surface clean may take around five minutes. A more thorough clean can take longer, depending on how much dirt has accumulated.
How to Clean an Office Keyboard Step by Step
Follow these steps in order to remove surface dirt and debris without causing unnecessary wear or moisture damage.
Step 1: Switch Off and Disconnect the Keyboard
Before cleaning, shut down the computer if necessary and disconnect the keyboard from its power source.
For a wired keyboard, unplug the USB cable. For a wireless model, switch it off and remove the batteries if the manufacturer recommends doing so.
If you are cleaning a laptop keyboard, shut down the laptop completely and disconnect its charger. Do not remove laptop keys unless the manufacturer specifically permits it, as their clips can be delicate.
This first step reduces electrical risks and prevents accidental keystrokes while you work.
Step 2: Remove Loose Dust and Crumbs
Turn a removable keyboard upside down and gently tilt it over a bin. Tap the back lightly with your hand to help release loose crumbs and dust.
Avoid shaking it vigorously or hitting it against a desk, as this can damage internal components.
Next, use a soft brush to loosen debris between the keys. Work across the keyboard in small sections, paying attention to the spaces around the space bar, Enter key and other frequently used keys.
Compressed air may also help dislodge stubborn debris, but use it only as directed by the product and keyboard manufacturers. Avoid excessive pressure or spraying in a way that could force debris deeper inside.
If you are cleaning several workstations, collect the loosened debris before moving to the next keyboard to avoid spreading dust around the office.
Step 3: Wipe the Tops of the Keys
Lightly dampen a microfibre cloth with a cleaning solution approved for your keyboard. The cloth should feel barely damp, not wet.
Wipe the tops of the keys gently, moving systematically from one side to the other. Use light pressure rather than scrubbing aggressively.
Pay attention to frequently touched keys, including the space bar, Shift, Enter and Backspace. These areas often accumulate fingerprints and skin oils.
If you are using isopropyl alcohol, check the manufacturer’s instructions for the permitted concentration and application method. Alcohol can damage certain coatings, printed labels and plastics, so it should not be treated as universally safe.
Never spray the product directly onto the keyboard.
Step 4: Clean Around the Edges of the Keys
Dirt often collects in narrow gaps where a cloth cannot reach.
Use a soft brush or a cotton bud that is only lightly dampened, if appropriate for the keyboard. Carefully clean around the edges of the keys without pushing debris further inside.
Do not press cotton buds into the gaps or leave fibres behind. If the area is already clean, avoid adding moisture simply for the sake of completing every gap.
For keyboards with heavily soiled spaces between the keys, a more thorough method may be needed. Our guide to deep cleaning an office keyboard explains how to approach more stubborn build-up.
Step 5: Clean the Keyboard's Frame and Underside
Use the same lightly dampened cloth, where approved, to wipe the keyboard’s frame, edges and wrist-rest area.
These surfaces can collect dust and fingerprints even when the keys appear clean.
If the keyboard has a detachable wrist rest, remove it only if the design allows this. Clean it according to its material and care instructions.
Keep moisture away from cable connections, charging ports, switches and other openings. Use a dry cloth for areas where liquid cleaning products are unsuitable.
Step 6: Allow the Keyboard to Dry Completely
Inspect the keyboard for any remaining moisture, particularly around the key edges.
Allow it to air-dry fully before reconnecting it or switching it on. Follow the manufacturer’s instructions if they specify a particular drying procedure.
Do not use a hairdryer, heater or other source of direct heat to speed up drying. Excessive heat can damage plastic parts and internal components.
Once the keyboard is completely dry, reconnect it and check that the keys respond normally.
If liquid has entered the keyboard, do not power it on simply because the outside looks dry. Follow the manufacturer’s advice or seek appropriate technical assistance.
Explore KeepShine’s free cleaning resources for practical ways to organise your cleaning routine and keep workspaces in better condition.
Pro Tip

When cleaning several keyboards, work from the cleanest equipment towards the dirtiest, changing or cleaning your cloth between devices as appropriate. This helps reduce the transfer of grime from one workstation to another. Keep a separate dry brush for loosening debris and a suitable cloth for wiping surfaces, rather than using one tool for every stage.
How to Keep an Office Keyboard Cleaner for Longer
Cleaning a keyboard regularly is easier than dealing with months of accumulated grime. A few simple habits can reduce the amount of dirt that builds up between thorough cleans.
Establish a Practical Cleaning Schedule
How frequently a keyboard needs cleaning depends on how many people use it, the working environment and the amount of visible dirt.
For everyday office maintenance, consider this starting schedule:
Daily: Remove visible crumbs and wipe obvious fingerprints where necessary.
Weekly: Wipe frequently touched surfaces and brush away loose debris.
Monthly: Inspect the keyboard more thoroughly and clean areas where dust or grime has accumulated.
Shared keyboards, busy reception desks and equipment used in food-handling environments may require more frequent attention. Follow workplace hygiene procedures and any manufacturer recommendations rather than treating this schedule as a universal rule.
For more guidance, see how often an office keyboard should be cleaned.
Encourage Good Desk Habits
Small changes can make a noticeable difference to how quickly a keyboard becomes dirty.
Encourage staff to wash and dry their hands before using shared equipment, avoid eating directly over keyboards and report sticky or malfunctioning keys promptly.
It also helps to keep the surrounding workstation free from unnecessary clutter. When dust and crumbs are regularly removed from the desk, less debris is likely to collect around the keyboard.
A consistent routine for the whole workstation makes this easier. You can follow our guide to cleaning an office desk properly to keep the surrounding surfaces in good condition.
Clean Shared Equipment Between Users When Necessary
In offices where keyboards are shared between employees, establish a clear process for cleaning high-touch equipment.
Use products approved for the specific device, observe the required contact time where a disinfectant is used, and allow surfaces to dry before the next person uses the keyboard.
Cleaning and disinfection are not identical. Cleaning removes dirt and residue, while disinfection uses an appropriate product to reduce microorganisms. A disinfectant will not necessarily work properly on a dirty surface, and not every cleaning product is suitable for electronics.
Mistakes to Avoid
Cleaning a keyboard is straightforward, but a few common mistakes can damage equipment or leave dirt behind.
– Spraying cleaner directly onto the keys: Liquid can enter gaps and reach sensitive components. Apply an approved product to the cloth instead, using only the amount needed.
– Using an excessively wet cloth: Too much moisture can seep beneath the keys and cause damage. Wring out the cloth thoroughly and keep liquid away from openings.
– Using harsh chemicals or abrasive materials: Strong solvents, scouring pads and unsuitable disinfectants can damage key labels, coatings and plastic surfaces. Check the manufacturer’s cleaning guidance before choosing a product.
– Reconnecting the keyboard before it is dry: Moisture left around the keys or connections can cause problems. Allow the keyboard to dry completely before restoring power.
– Removing keys unnecessarily: Many keyboard keys have small plastic mechanisms that can break if removed incorrectly. Clean around them unless the manufacturer confirms that removal is appropriate.
– Ignoring the surrounding desk: Dust and crumbs can quickly return to a clean keyboard if the area around it remains dirty. Include the desk and other frequently touched surfaces in your regular routine.
If maintaining a clean and organised workplace is becoming difficult, KeepShine can help with professional cleaning for the wider office environment.
More Questions About Cleaning Office Keyboards
Here are answers to a few additional questions about keeping office keyboards clean, safe and ready for everyday use.
Can I use disinfectant wipes on an office keyboard?
Some disinfectant wipes are suitable for certain keyboards, but others may damage the key markings or surface coatings. Check the manufacturer’s instructions and the product label before use. Never use a wipe that leaves the keyboard excessively wet, and avoid moisture entering the gaps or electrical openings.
Can I use a vacuum cleaner to clean between the keys?
A vacuum may help remove loose dust and crumbs if the keyboard manufacturer permits it. Use an appropriate soft attachment and avoid excessive suction or static-generating tools. A soft brush is often sufficient for routine cleaning. Do not use a vacuum method that could damage the keys or internal components.
How do I clean a sticky office keyboard?
First disconnect the keyboard and remove loose debris. Wipe the affected keys with a cloth lightly dampened with a manufacturer-approved cleaner. Avoid forcing liquid underneath the keys. If a sugary drink or other liquid has entered the keyboard, surface cleaning may not be enough. Follow the manufacturer’s advice or arrange a professional assessment.
Is it safe to use water to clean a keyboard?
A barely damp cloth may be suitable for some keyboard surfaces, but water should never be poured or sprayed directly onto the device. Some manufacturers permit a small amount of water on a cloth, while others specify different cleaning methods. Always check the model’s instructions and keep moisture away from openings and connections.
Should I clean my keyboard before or after cleaning my computer screen?
It is practical to remove loose debris from the keyboard first, then clean the desk and finish with the computer screen. This order helps you manage dust and crumbs without repeatedly cleaning the same areas. Use a separate, suitable microfibre cloth for the screen and follow the screen manufacturer’s instructions. Our guide to cleaning a computer screen safely explains the process.
What should I do if my keyboard stops working after cleaning?
Disconnect it immediately if it is safe to do so, and do not repeatedly reconnect it to test whether it works. If moisture may have entered the device, follow the manufacturer’s instructions and seek technical assistance where necessary. For a laptop keyboard, avoid opening the computer yourself unless you are qualified to do so.
Subscribe to KeepShine for more practical cleaning guides, including advice on maintaining cleaner keyboards, desks and everyday office equipment.
Final Thoughts: Make Keyboard Cleaning Part of Your Office Routine
A clean office keyboard does not require expensive equipment or complicated products. Regularly removing loose debris, wiping the keys carefully and allowing the device to dry fully will help keep it in good condition.
The most important thing is to use a method suited to the particular keyboard. Avoid unnecessary moisture, harsh chemicals and forceful cleaning, especially around delicate keys and electrical connections.
If you manage an office, make keyboard cleaning part of a wider workstation maintenance routine. A little consistent attention can prevent grime from building up and make it easier to maintain a pleasant working environment.
Start with one keyboard, gather the appropriate supplies and establish a routine that your workplace can follow consistently.